Tuesday, June 26, 2007

Simply Superb

Grilled Veggie Salad

As the temperature climbs steadily through the 100’s, the idea of standing over a hot stove or oven for any length of time is becoming increasingly less appealing. As such, the grilling season is in full swing here at Blackberry Pockets, with teriyaki New York strip steaks, seared ahi, flame broiled burgers, smoky bacon-wrapped scallops and many a cold vodka tonic helping to make the intense heat a little more bearable.

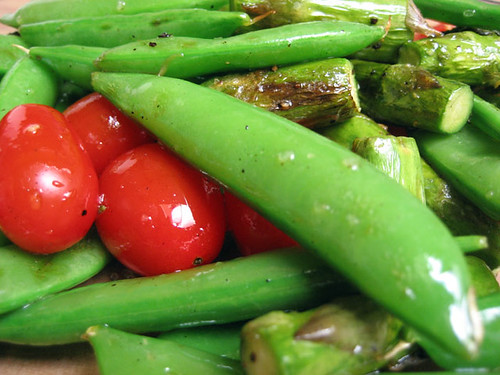
In addition to my affinity for grilled meats, I also love to grill a variety of vegetables. Asparagus and sugar snap peas are two of my favorites and when tossed with olive oil and salt, result in a satisfying flame-kissed snack that works great as an appetizer or a harmonious accompaniment to your main course.

Although both of these items make fantastic sides on their own, I have discovered that combining them, along with grape tomatoes, creates a crisp, fresh and delicious salad that I could probably eat every day. This recipe is incredibly easy to prepare and it is always a hit!

red and green
Simple Grilled Veggie Salad
½ lb of Asparagus, trimmed (about 12 spears)
½ lb of Sugar Snap Peas
1 cup of Grape Tomatoes (whole)*
2 tablespoons of Extra Virgin Olive Oil
Sea Salt to taste
½ teaspoon fresh cracked pepper
*Note: *I prefer to leave the grape tomatoes whole for this recipe in order to add a nice juicy pop to every bite. However, if the tomatoes you purchase are not particularly sweet or crisp, it would probably be better to slice them in half and squeeze the seeds out of them.

Preheat your grill to medium-high.

Cut the asparagus into equal-length pieces about 2 inches long. Combine the chopped asparagus with the peas in a medium sized bowl and toss with 1 tablespoon of the extra virgin olive oil until all pieces are evenly coated.

Place the asparagus and snap peas on the grill and cook for 5 minutes, giving the vegetables a quarter roll with your spatula every minute or so, until they are bright green with minimal char.

Remove the asparagus and peas from the grill, place back into the bowl, and add the grape tomatoes. Add the other tablespoon of olive oil, salt and pepper to the vegetables and combine until everything is evenly coated. Enjoy!


Variations

slad ingredients

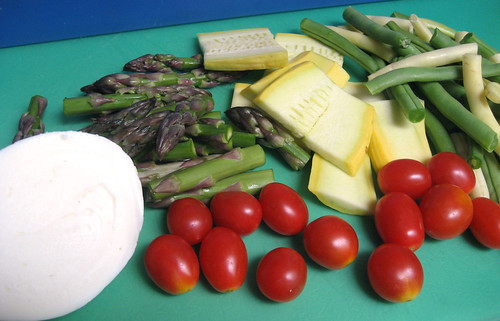
I thought this recipe might be made even better by adding a few more ingredients and I prepared a batch that included yellow summer squash, green beans, and fresh mozzarella.

salad

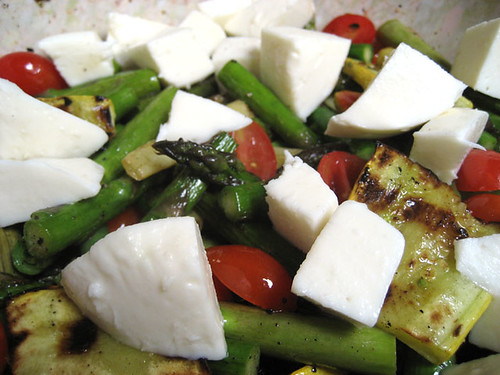
Although it was perhaps a little more visually appealing, I think the better recipe was the original less complex version. However, maybe I am still missing something; so play around with this recipe and let me know what you come up with!

Thursday, June 21, 2007

Cracking the Candy Racket: Cashew Butter Crunch


TOFFEE RECIPE

almond butter toffee
For some time, I have found myself increasingly drawn to artisan candy makers in order to get my sugar “fix”. Although at one point, standard treats from the supermarket or snack machine were enough to sate my inner candy demon, as time goes by, I am discovering that they are no longer up to the task. There is just something undeniably processed about the flavor of mass-produced foods. It’s something industrial, as if I can actually taste the conveyor belts.

That is not to say that I have given up on the snickers, starbursts and jelly bellies or that I no longer eat them. I do. By the pound. However, I am relying more and more on the products from choclatiers, online candy shops and Trader Joes (mmm, 10-pound bar of chocolate) to satisfy my cravings.

As I attempt to refine my taste for sweets, I am learning that certain artisan candies, specifically caramels and toffees, tend to be overpriced. Gourmet caramels and English toffees can cost upwards of $30.00 per pound. This is mildly absurd considering that these items are basically made from sugar, water, butter, and corn syrup combined with varying degrees and durations of heat…

Now, I understand that candy making can get a little more complex than that, but not much, which is why I have decided to stick it to these miserly sugar pushers and make my own. No longer will I allow these candy barons to get rich from exploiting their workers and gouging the market! I will not succumb to the temptation of their smoked salt caramels and blood-diamond truffles!

In all seriousness, I am actually pretty impressed with the quality of domestic chocolatiers (like Fran’s Chocolates, for instance) and if you do end up spending $30.00 for a tiny box of designer candies, you’re probably in for a real treat. Nevertheless, if I can make a product that is just as good, and for a fifth of the price, I’m gonna!

And so I present to you, my tasty toffee recipe:
cashew butter crunch toffee

Cashew Butter Crunch.
1 cups unsalted dry roasted cashews – chopped
1/4 teaspoon of salt (for the nuts) + 1/8 teaspoon of salt (for the toffee)
1 cup butter
1 1/2 cup sugar
3 tablespoons light corn syrup
3 tablespoons water
1 teaspoon pure vanilla (or almond) extract

8 ounces semisweet chocolate - chopped (for the topping)

*You will need a candy thermometer for this recipe unless you are an old-school candy whiz like my grandma; in which case, we are aiming for just barely at the “hard crack” stage.

Preheat your oven to 375 degrees F and either finely chop the cashews or pulse them a few times in a food processor.

When the nuts have been chopped, spread them on a cookie sheet and place them in the oven for about 8 minutes until lightly toasted and golden brown (FYI, if you detect the smell of toasted cashews, take them out quick; that delicious scent can quickly change to the acrid odor of nutty smoke). Sprinkle the nuts with ¼ teaspoon of salt.

Allow the toasted cashews to cool and line a 9” square baking pan (a round pie pan can work too) with aluminum foil. Evenly coat the bottom of the pan with ½ cup of the toasted nuts and set aside.

Combine butter, sugar, corn syrup, water, vanilla extract and the extra 1/8th teaspoon of salt in a medium sized saucepan. Heat on medium-high heat, stirring frequently, until the temperature on your candy thermometer reaches 299 degrees F (300 and 301 is ok but makes the brittle a little darker than I like), pay attention to the color of the candy as well.

Note: this segment of the process takes some time. Unfortunately, I forgot to time myself but I would estimate that it took about 25 minutes (it might take less or more time for you). In any case, just be patient and keep an eye on the candy thermometer because although it will take a fair bit of time to reach 280 degrees F, the temperature will shoot up rapidly after that.

When the candy has reached the desired temperature, remove the saucepan from the heat and transfer the candy to the baking pan.

While the candy is cooling, finely chop the chocolate into very small bits. After the candy has cooled for about 10 minutes, place the chocolate bits on top of the candy and let them sit for another minute to allow them to melt. Then spread the chocolate using a knife or a spatula until it is evenly distributed across the top of the toffee. Now place the remaining ½ cup of chopped cashews on top of the chocolate.

Place in the refrigerator and allow to cool for 30 minutes. After it has cooled, the candy should release from the pan and the foil lining should be easy to peel off. Break into peaces, and enjoy!
cashew butter crunch toffee

Additional Thoughts
This is a recipe I have made multiple times and it always turns out fantastic. It is also pretty forgiving if your temperature is off by a couple of degrees.

These toffees have been described as “better than See’s” by my roommate’s mother and as “dancetastic” by me. This recipe is easy, fun and makes an impressive gift when artfully packaged. Make some today!

P.S. Please leave comments by clicking on the (most likely) “0 comments” line below. I know I included a lot of detail in this post but candy making actually is kinda tricky and I don’t want any one to waste precious sugar and butter because I was negligent.

Monday, June 18, 2007

Epic Noodles

Welcome to the first post of Blackberrypockets.com… well, technically blackberrypockets.blogspot.com but that just doesn’t have the same ring to it (or the marketability ;)). Nevertheless, welcome to Blackberry Pockets, the food blog the critics (my beta audience) are already saying “needs some posts” and “the grapes look good” about.

As the masthead implies, I hope to include some recipes using the delightful, black, berries my forbears imported from Germany/Russia during their immigration. And what would be more fitting than highlighting the swartzenberren maultaschen in my initial posting? Well, probably nothing. However, it’s not quite blackberry season so I will have to go with the next best thing: The BEST Cold Sesame Noodle Salad.

Cold sesame noodles are one of the first things I learned to cook and although there are quite a few recipes for this item floating around, I can say quite objectively that these are the best! I have picked up quite a few tantalizing recipes over the years and this simple dish has remained the consistent crowd favorite. Even when served alongside cedar-plank salmon, lobster tail or filet mignon, presenting this dish never fails to prompt exclamations such as “Ooh, are those noodles? Yay!” or “I didn’t know you were making the noodles!”

Trust me, master this recipe and you will be in demand at potlucks for years!


cold sesame noodles

Mom’s Sesame Noodles (serves 4)
6 oz (1 Package) of Chuca Soba lo-mein noodles or 8 oz (half a package) of spaghetti

For the sauce
2 tablespoons of soy sauce
2 tablespoons of sesame oil
1 tablespoon of rice-wine vinegar
1 tablespoon of brown sugar
2 dried, ground tepin-chilies

Garnish
¼ cup juliened carrots
2 tablespoons sliced chived
1 tablespoon sesame seeds

*For a larger recipe, the ingredients can be doubled.

Bring 2 quarts of water to a boil in a medium-sized stock pot.

While waiting for the water to boil, combine the soy sauce, sesame oil, rice-wine vinegar, brown sugar and tepin-chilies in a large mixing bowl and whisk together until combined and the sugar has dissolved.

Boil noodles according to the specifications on the package or until al dente.

Thoroughly drain the noodles and transfer them to the bowl containing the sauce mixture. Toss the noodles with the sauce until they are evenly coated. Cover the bowl with platic wrap (or transfer to a ziplock bag) and chill in the refridgerator for at least an hour or up to 24. These noodles are even more fantastic the second day, so feel free to make them a day in advance!

When you are ready to serve, prepare the carrots and chives and combine them, along with the sesame seeds, with the noodles. Enjoy!

Additional Notes
One of the best aspects of this recipe is that it is incredibly versatile. It can easily be manipulated to suit your specific tastes or just a fleeting whim. A few of the alterations I have tried include adding a tablespoon of spicy mustard, replacing the brown sugar with honey, trying different types of chilies, adding a tablespoon of peanut butter, and replacing the vinegar with Sake.

Although the noodles as assembled in the recipe above will invariably provide you with a delectable treat, feel free to mix up some of the ingredients. And be sure to let me know what you come up with!