Friday, December 31, 2010

Cuppa Hot Jones

hot jones

Here is a holiday treat to help you ring in the New Year with froth and with luster and all that they bring!

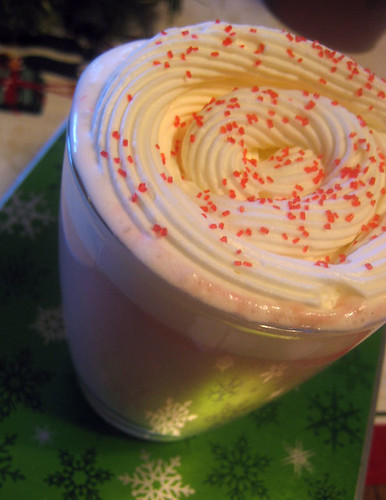
I am a big fan of www.homestarrunner.com and have noticed that from time to time, both Homestar Runner and Strong Bad have mentioned drinking a cuppa "hot jones". And according to the Homestar Runner Wiki, “Hot Jones, a popular wintertime beverage, is a steaming white liquid with red sprinkles in it. It may be a coffee or chocolate drink topped with whipped cream.” I like to think that it is a cup of hot white chocolate cocoa spiked with vodka, and here is a recipe for just such a drink.

White Chocolate Hot Jones Recipe

2 cups water

6 cups milk

1 (12 ounce) package white chocolate chips

1/2 teaspoon vanilla

½ teaspoon cinnamon

Whipped cream

Red sprinkles

Vanilla Vodka

Grenadine for pinking it up

Method

Stir together water, milk, chocolate, vanilla, and cinnamon in a medium-sized stock pot.

Heat on your stovetop on low for an hour, stirring occasionally, until all ingredients are evenly melted.

Add an ounce of vodka and a half ounce of grenadine to a mug, fill the rest up with hot Jones, and top with whipped cream and sprinkles.

cuppa hot jones

Mmm, that’s good Jones!

Thursday, December 30, 2010

Sweet Potato and Black Bean Enchiladas

black bean sweet potato enchilada

It’s the end of enchiladas month here, at Blackberry Pockets, and after providing two classic sauce and casserole options to satisfy your Tex-Mex cravings, I’m going to close with something a little different:

Sweet Potato and Black Bean Enchiladas

When you make enchiladas as often as I do, it becomes important to switch things up from time to time. Although I think it’s probably difficult (if not impossible) to really become “sick” of red or green enchiladas, it does help to throw in a new recipe to help keep everything tasting fresh. My sweet potato and black bean enchiladas recipe offers a great alternative to those who might find themselves in an creative rut, or for anyone who just wants to expand their enchilada repertoire. Plus, they're rich, creamy, and delicious, so why not try them?


Sweet Potato and Black Bean Enchiladas Recipe

2 cups of sweet potato salsa (recipe available here)

1 cup diced onion

1 can of black beans – rinsed

1 cup of aged cheddar cheese

1 cup of Colby jack cheese


Method

Preheat oven to 350 degrees Fahrenheit

Pour ¼ cup of the salsa into a 9.5”X13.5”X3.5” (3 quart) casserole dish to coat the bottom.

Heat tortillas, four at a time, in the microwave for 14 seconds or until soft and pliable.

Place a tortilla on a cutting board; add a tablespoon of onion, a tablespoon of cheese, a tablespoon of beans, and roll the tortilla with filling into a tube.

black bean sweet potato enchilada filling

Place rolled enchiladas into the casserole until it is full and sprinkle any leftover beans an onion on top.

black bean sweet potato enchiladas

Add the sauce and top with the cheese.

sweet potato salsa enchiladas

Bake for 30-40 minutes until the cheese has melted and started to caramelize. If you think that your cheese is melting too soon, you can tent the casserole with aluminum foil to prevent it from burning.

black bean sweet potato enchilada casserole

Remove from the oven and enjoy!

Monday, December 27, 2010

Sweet Potato Salsa

SWEET POTATO ENCHILADA SAUCE

salsa on tamale

Bored of the typical, red or green salsa choices? Looking for something a little more orange, perhaps? Look no further, my sweet potato salsa recipe is excellent topped on tacos, baked in enchiladas, or gulped by the spoonful!

SWEET POTATO SALSA RECIPE

1 medium sweet potato

2 poblano chiles

2 tomatillos

1 tablespoon of olive oil

1/2 onion - diced

2 cloves of garlic - minced

2 cups vegetable broth

¼ cup fresh, chopped cilantro or oregano

1 teaspoon of salt

1 tablespoon of lime juice

1 teaspoon apple cider vinegar

Special Equipment: Emersion blender/ regular blender

METHOD

Set your oven to broil and line a cookie sheet with aluminum foil. Peel the sweet potato and slice it into long strips.

Place the sweet potato strips on a drying rack on the lined cookie sheet. Add the poblanos and tomatillos to the cookie sheet as well, and place in the oven.

ingredients

Broil for five minutes, until the skins on the chiles begins to blacken, and then flip the chiles, tomatillos and sweet potato slices. Broil for another five minutes, remove from the oven, and allow to cool.

Add the olive oil, diced onion, and garlic to a large stock pot and sauté over medium heat until the onion is translucent.

Remove the skins from the chiles and the husks from the tomatillos. Roughly chop the roasted chiles, tomatillos, and sweet potatoes. Add them to pot with the onions and garlic.

Add the broth, fresh herbs, salt, vinegar, and lime juice to the pot, and bring the mixture to a boil. When it begins to boil, reduce the heat and allow to simmer for five minutes. Reduce the heat to low, and using an emersion blender, blend the sauce until smooth.

At this point, you actually have a pretty nice, spicy sweet potato soup!

sweet potato soup

Allow the sauce to cool and strain through a fine-mesh sieve.

Eat with a chip, or save for Wednesday’s enchiladas recipe!

salsa on chip

Wednesday, December 22, 2010

Enchiladas Rojas

Red Cheese Enchiladas Recipe
new enchiladas rojas
Continuing with my enchiladas theme this month, I am now presenting my recipe for enchiladas rojas. This is a classic baked cheese enchilada recipe with a rich and delicious red chile sauce.

ENCHILADAS ROJAS RECIPE

2 cups of chile roja sauce (recipe available by clicking here)

18 corn tortillas

½ large sweet onion - diced

½ pound of blended Colby jack/ aged cheddar cheeses

METHOD

Preheat your oven to 350 degrees Fahrenheit

Pour ¼ cup of the chile sauce into a 9.5”X13.5”X3.5” (3 quart) casserole dish to coat the bottom.

Heat tortillas, four at a time, in the microwave for 14 seconds or until soft and pliable.

Not surprisingly, the enchilada assembly is identical to that of my green enchiladas recipe. Place a tortilla on a cutting board; add a tablespoon of onion, a tablespoon of cheese and roll the tortilla with filling into a tube.

cheese enchilada
This picture also features a roasted red bell pepper as filling; feel free to mix it up!

Place the rolled enchilada in the pan, repeat until the pan is full.

rolled enchiladas

Pour the remaining sauce over the enchiladas and sprinkle the remaining cheese on top.

unbaked red enchiladas

Bake for 30-40 minutes until the cheese has melted and started to caramelize. If you think that your cheese is melting too soon, you can tent the casserole with aluminum foil to prevent it from burning.

red enchiladas

Eat with rice and beans and guacamole!

Monday, December 20, 2010

Enchilada Sauce

Chile Roja Sauce Recipe

dried red chiles
Red chile sauce is delicious for dipping chips, smothering burritos, or cooked in cheese enchiladas. Although, to me, it is not as day-to-day tasty as salsa verde, homemade red chile sauce is still an excellent condiment to add rich depth of flavor to your Mexican and Tex-mex dishes.

ENCHILADA SAUCE RECIPE

10 dried red chile pods

¼ cup fresh cilantro, oregano, or basil

2 large cloves of garlic

1 tablespoon of lime juice

2 tablespoons of orange juice

1 teaspoon of salt

½ teaspoon of black pepper

Special Equipment: Food processor or blender

METHOD

Remove the stems and seeds from the chile pods and toast them in a large sauté pan over medium heat until fragrant.

While the chiles are toasting, bring three cups of water to a boil.

When the chiles have toasted, transfer them to a bowl, pour the boiling water over them and cover with plastic wrap. Allow the chiles to steep for 30 minutes.

steeping chiles

Meanwhile, combine the fresh herbs, garlic, lime juice, orange juice, salt, and pepper in the bowl of a food processor.

When the chiles have steeped for 30 minutes, place them in the food processor and reserve two cups of the steeping liquid.

Process the ingredients until smooth, slowly adding the reserved chile liquid a little at a time.

Strain the mixture into another container through a fine-mesh sieve.

Eat with a chip!

red chile sauce on chips

Come back Wednesday for my enchiladas rojas recipe!

Wednesday, December 15, 2010

Enchiladas Verdes

Green Enchiladas with Sweet Potatoes Recipeenchiladas verdes

I have a bit of an addiction to enchiladas! There is something about the combination of a savory salsa, melty cheese, and chewy tortilla that I find irresistible. I typically make a casserole, or baked, style of enchilada because they can be prepared ahead and they are just so delicious. Like a Mexican lasagna!

I began making them fairly regularly after moving to Texas, where I’ve found that while tasty, there are few vegetarian enchilada options at the restaurants (even the cheese enchiladas are covered in a meat gravy). Now, I’m not opposed to meaty enchiladas, but I don’t want to eat them all the time. Luckily, I’ve developed some really outstanding enchilada recipes that will appeal to both vegetarian and omnivore alike! Let’s start with my green enchilada with sweet potato recipe.

Enchiladas Verdes Recipe

2 cups of Salsa Verde (recipe available HERE)

½ sweet onion – diced

1 large sweet potato

½ lb sharp, aged cheddar cheese (like English coastal)

½ lb Colby jack cheese

18 corn tortillas

1 tablespoon of olive oil

Method

Dice the sweet potato into ¼ inch cubes and blanch in boiling water for 4 minutes. Strain and allow to dry.

When the sweet potatoes have dried, preheat a large sauté pan on your stovetop on high. Add the olive oil to the pan, toss the sweet potato cubes in the pan and sauté until evenly caramelized on the edges.

fried sweet potatoes

Preheat oven to 350 degrees Fahrenheit.

Shred the cheddar and jack cheeses.

cheese blend

Pour ¼ cup of the salsa verde into a 9.5”X13.5”X3.5” (3 quart) casserole dish to coat the bottom.

Heat tortillas, 4 at a time, in the microwave for 14 seconds or until soft and pliable.

Place a tortilla on a cutting board; add a tablespoon of onion, a tablespoon of sweet potato, and a tablespoon of cheese.

enchilada assembly

Roll the tortilla with filling into a tube.

enchilada

Place the rolled enchilada in the pan, repeat until the pan is full. Pour the remaining filling over the enchiladas, and top with leftover cheese and any remaining filling.

unbaked enchiladas verdes

Bake for 30-40 minutes until the cheese has melted and started to caramelize. If you think that your cheese is melting too soon, you can tent the casserole with aluminum foil to prevent it from burning.

enchiladas verdes

Enjoy!

Leftover enchiladas make for a great egg-on breakfast!

Monday, December 13, 2010

Salsa Verde

Tomotillo Salsa Recipe

more chips and salsa

Salsa verde, or tomatillo and green chile salsa, is one of my favorite things to make because it goes great with everything. Salsa verde is incredibly versatile, and it can be applied to a variety of dishes ranging from the traditional enchiladas verdes to the less obvious green chile pizza. Sometimes I just make a big vat of it and have a glorious day on the couch with some chips and reruns of Project Runway!

Salsa Verde Recipe

6 tomatillos

4 hatch, poblano, or a combination thereof (preferred) chiles

½ an onion

2 cloves of garlic

1 teaspoon of salt

juice of one lime (about 1 tablespoon)

½ cup of vegetable stock

¼ cup of cilantro

Special Equipment: Food processor or blender

Method

Set your oven to broil. Line a cookie sheet with aluminum foil, place the tomatillos, still in their husks, and chiles on the pan, and put the pan in the oven on the middle rack.

chiles verdes

Check the roasting vegetables from time to time, and flip them over when their skins start to blacken. When the chiles have developed a nice char on their skins, remove the pan from the oven and set aside to cool.

While the chiles are cooling, dice the onion, mince the garlic, and saut̩ together until the onion is translucent Рset aside.

Once the roasted vegetables have cooled, peel off the charred skins of the chiles, remove the stems and seeds, and place them in the bowl of a food processor. Then, remove the husks and stems of the tomatillos and add them to the food processor as well. Finally, add the sautéd onion and garlic, the salt, lime juice, and cilantro.

salsa blend

Puree until smooth.

salsa verde

Eat with a chip!

chips and salsa

This recipe makes about 2 cups of salsa, which is perfect for my forthcoming enchiladas recipe, but if you want a thinner sauce, add another half cup of vegetable stock or water.

Thursday, December 9, 2010

Friday Quick Bites

Cucumber, Tomato, Basil Salad with Lime Dressing
cucumber tomato basil salad

Here is a quick and easy salad that is sure to please. With just three core ingredients, this salad’s simple construction belies its complex flavor. In addition to the ease with which this recipe comes together, its combination of sweet grape tomatoes, cool cucumbers, and fragrant basil make it a go-to side dish when I’m crunched for time or when I just crave something crisp and refreshing!

Cumber, Tomato, Basil Salad Recipe

1 English (hothouse) cucumber

2 cups of grape tomatoes

¼ cup of fresh basil

Method

Begin by splitting and seeding the cucumber, and then slice the cucumber into ¼ inch half moons. Then split the grape tomatoes lengthwise.

tomatoes
Finally, chiffonade the fresh basil by stacking the leaves, rolling them into a basil cigar, and slicing them into thin strips.

Combine all of the ingredients together in a bowl and then add the following dressing:

Lime Vinaigrette Recipe: This Recipe is Super Easy Too!

Juice of 1 lime

1 tablespoon of extra virgin olive oil

1 tablespoon of honey

½ teaspoon salt

½ teaspoon pepper

Method

Combine all of the ingredients in a container (I like to use a 2-cup measuring cup) and whisk (or stir vigorously with a fork) until it has emulsified.

Pour on your salad and enjoy!

cucumber tomato basil salad

spicy tomato basil  cucumber edamame salad
This one has edamame and parmesan, too! Oh and looks like I left the basil leaves intact. Also good!

Tuesday, December 7, 2010

Brick-Oven Pizza at Home

How to Make Pizzeria-Style Pizza in Your Home Oven
brick oven pizza at home

Previously, on Blackberry Pockets… Our pizza dough had proofed, risen, and been shaped. This time, I will show how to achieve the taste and texture of a brick-oven pizza in your very own home!

I would like to thank my friend Pam who gave me the idea to try broiling my pizza. This suggestion put me on the path to figuring out my now tried and true bake-then-broil combination method of pizza perfection.

Note

In order to achieve these results you will require a baking stone and a pizza peel (or similar tool for placing your pan-less pizza in the oven).Now, on to the fun!

Method – 10 Steps to Pizza Perfection!

1. Make sure your stone is located on the center rack, and preheat your oven to 550 degrees Fahrenheit for 45 minutes to an hour.

2. After shaping your dough and putting it into a pan, perforate the dough across its surface with a fork.

3. Place the dough (while still in its pan) into the preheated oven.

4. Bake for 5-7 minutes until the dough begins to caramelize and gets brown on the edges.

5. Remove the pan from the oven, remove the pre-baked dough from the pan, and place it on a wire rack.

6. Set your oven to “broil”.

7. Add your favorite sauce and toppings - I recommend olives, onions, and candied bacon- to what will now be referred to as the “pizza”.

unbaked pizza

8. Using a peel, or other method, place the pizza back in the oven.

9. Bake for another 5-7 minutes, until it reaches your desired level of doneness. Be sure to keep a close eye on it after 5 minutes, because it can rapidly go from Brick-oven badass, to brick-oven burnt.

10. Remove your pizza from the oven and return it to the wire rack.

peeled pizza

Allow to cool and enjoy!

pizza crust bottom
Nice crispy crust!

open crumb
Nice open crumb!

Here are a few ideas for saucing and topping your pizza.


cheese-crisp pizza
Cheese crisp pizza with salsa verde, Monterey Jack cheese, and sliced green chiles!


pizza margherita
Pizza Margherita!

potato pizza
Marinara sauce with caramelized onions, mushrooms, and potatoes!

pesto pizza
Pesto pizza with onions and black olives!


Sunday, December 5, 2010

Pizza Dough Revisited

The more I learn about bread, the more I realize just how much more there is to learn. Almost as soon as I think I have bumped my bakin’ up to the next level (level 2!), I find myself humbled by true talent. Fortunately, I remain excited by the prospect of learning it all! Bread baking has become my favorite hobby and mastering this craft can clearly be a life-long pursuit.

So, after admitting my infantile level of baking knowledge, am I still going to presume to offer a recipe on making pizza dough? Well, yeah. Why not? After all, everybody thinks that they make the best pizza, regardless of skill, right? Lucky for you, with me, it’s actually TRUE!

Pizza Dough Recipe

The Night Before: Develop a dough starter that will add flavor and texture to your pizza.

1 cup all-purpose flour

3/4 cup water

¼ teaspoon yeast

Mix the ingredients together in a bowl until they reach a pasty consistency and are all fully incorporated. Cover the bowl with plastic wrap and set it aside.

The Day of: Make the dough.

2 cups of bread flower

1 cup of all-purpose flour

1.5 teaspoons of salt

1 cup of warm water

1 teaspoon of sugar

1 teaspoon of yeast

1 tablespoon of olive oil

All of the starter

Method

Mix together the flours and salt. Add the sugar to the cup of water and then whisk the yeast into the sugar water solution. Allow the yeast solution to proof for 3-5 minutes until it achieves a foamy head.

Combine all ingredients (the starter, dry ingredients, and the yeast solution) in the bowl of your stand mixer and mix on the low setting for 1 minute. The dough should be a little sticky, but still workable. If the dough is still too sticky, add a little flour and mix for another minute.

When the dough looks like this:


wed dough

Place it in a bowl, cover with plastic wrap, and let it rise for 1.5 hours, stretching and folding ever 30 minutes. Next, add the oil to the dough bowl, put the dough in the dough bowl, and mix the dough around to coat it in oil. Place the dough (in its dough bowl) in the refrigerator and let it rise until doubled (should take three or four hours).


pizza dough

There you go! Beautiful pizza dough from a pizza bakin’ baby. Next time I'll teach you how to make brick-oven style pizza at home!

Stay tuned for next week's exciting episode of "Pizza and Dough-Bowl"!
dough pizza

Saturday, July 17, 2010

Fruit Gems

AKA Pates De Fruit or Pectin Gels

strawberry and peach candies

Oh, pates de fruit (pronounced paht day fwee), my old adversary, long you have vexed me. I’m sure many of you have come across tantalizing blog posts featuring pates de fruits, written by a variety of reputable bloggers, tempting us with beautiful images, and enticing us with delicious tales of these seeming pinnacles of patisserie. How could anyone not want to give these recipes a try? Moreover, who could resist when the execution always seems so easy? Too easy.

I have lost track of how many failed batches of ruined candy I turned out on my journey to fruit jewels. I had great trouble achieving the correct texture, a task that was undoubtedly made more challenging by the fact that I’ve never actually had homemade pates de fruit before. In any case, I was hoping for something with a chewy initial resistance but not too sticky—something akin to a Sunkist fruit gem or a Trader Joe’s fruit gel – but my batches came out like chewy jam, gelatin, or just fruity goo.

So why would I, a candy novice who isn’t even sure what these candies are supposed to taste like, presume to post a recipe for this treat? Because I got it right, friends! I’m sure of it, and I’m proud.

Now, I certainly wouldn’t say that my recipe is superior to any other that’s out there, but it’s just as good (in fact, it’s identical to most), and I have some tips to help you avoid some of the critical errors that I encountered along the way to success. I also have an important warning for anyone who wants to attempt making this or any other pates de fruit recipe: your candy is NOT going to turn out right the first time. I’m sorry, but them’s the breaks; every batch of candy is a little different, and there is an art to making it which requires a process of trial and error in order to achieve perfection. If you’re still willing, let’s get to work.

Lemon Ginger Strawberry Pates de Fruit, Fruit Gems Recipe:

  1. Fresh Strawberries -32 ounces
  2. Zest of one lemon
  3. Fresh Grated Ginger – 1 teaspoon
  4. Sugar – 600 grams
  5. Liquid Pectin (I used Certo brand, canning pectin) – 3 tablespoons
  6. Lemon juice – one lemon

Method:

Line a 9 inch square brownie pan with parchment paper.

Clean and hull the strawberries and place them into a food processor with 1/3 of the sugar, lemon zest, and grated ginger. Process until the mixture is a very smooth liquid.

Next, STRAIN, STRAIN, STRAIN the strawberry/sugar liquid through a fine-mesh strainer and into a pot. You should end up with around 2 cups or 600 grams of strained fruit puree.

Add the second 1/3 of the sugar and half of the lime juice (from half the lime) to the puree, put the pot on your stovetop set to medium-high, and bring to a boil, stirring frequently. When the mixture begins to boil, add the remaining sugar and pectin, and continue to stir the mixture frequently.

Here comes the tricky part: Most recipes say that you need to let your mixture boil until it reaches a temperature of 222 degrees Fahrenheit, which is probably correct. However, I have not once made a batch that was able to reach that temperature. Instead, I suggest just letting it boil for around 30-40 minutes, stirring frequently, until it reaches a very thick viscosity, forms gentle, infrequent bubbles on the surface when left alone, and looks kind of like the following image:

bubbling peach
(Actually, an image of peach bubbling crude, but for the purposes of this blog, we'll consider it strawberry)

When you think the candy is ready, transfer it from the pot to the lined brownie pan in an even layer. Place the pan on a cooling rack in the refrigerator and allow the candy to cool and set up for 10-24 hours. When the candy has set up, you can remove it from the pan and parchment, cut it into the shapes you like and roll it in sugar. These fruit gems make elegant gifts and delicious treats!

Important Notes

  • STRAINING: It is absolutely essential that the fruit be strained through a fine mesh strainer after it is pureed. Otherwise, you’ll end up with something closer to jam than candy.

  • TEMPERATURE: Your candy thermometer might never get up to 222 degrees, 210 degrees, or even 200 degrees. I’ve tested these recipes with multiple candy thermometers and my candy rarely got up to temperature. In fact, many times the temperature of the candy would drop precipitously and without reason. This is the main reason why making these candies is a process of trial and error; you will need to use your senses to determine if your pot of bubbling crude is ready or not.

  • NEVER USE BUTTER: I found a recipe, which I tried, that called for the addition of butter. Now I’m typically a butter proponent, and I’m not sure how it could ever make anything worse, but guys, it was so bad! So bad, oh my gosh!

  • SUBSTITUTING GELATIN: Don’t substitute gelatin for pectin. Why? Because your batch will come out more like jello shots than candy.

  • NOT SETTING UP? If your candy does not set up and become firm, you can likely salvage your work by returning the results to a pot with another ½ cup of sugar and boiling the mixture again for another 15 minutes.

Watermelon and Peach Pate de Fruit
watermellon pectin candy


Well, with that, I wish you all the best in your candy making efforts. Regardless of how your batch of candy ends up, it is still almost always edible. And many times, it is tasty, if perhaps, not what you expected. Furthermore, the process is always fun; just try not to burn yourself!

Homemade Pate de Fruit Candy Gift Box
homemade candy box