Thursday, December 9, 2010

Friday Quick Bites

Cucumber, Tomato, Basil Salad with Lime Dressing
cucumber tomato basil salad

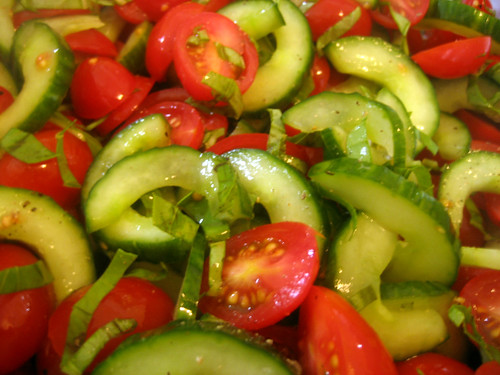
Here is a quick and easy salad that is sure to please. With just three core ingredients, this salad’s simple construction belies its complex flavor. In addition to the ease with which this recipe comes together, its combination of sweet grape tomatoes, cool cucumbers, and fragrant basil make it a go-to side dish when I’m crunched for time or when I just crave something crisp and refreshing!

Cumber, Tomato, Basil Salad Recipe

1 English (hothouse) cucumber

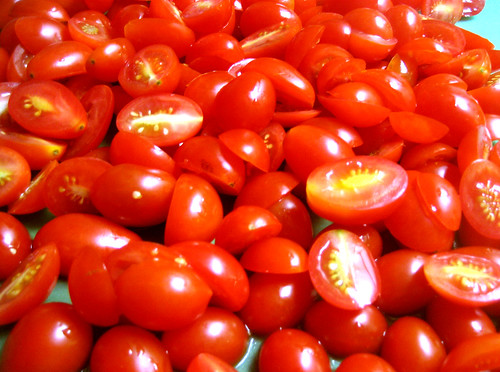
2 cups of grape tomatoes

¼ cup of fresh basil

Method

Begin by splitting and seeding the cucumber, and then slice the cucumber into ¼ inch half moons. Then split the grape tomatoes lengthwise.

tomatoes
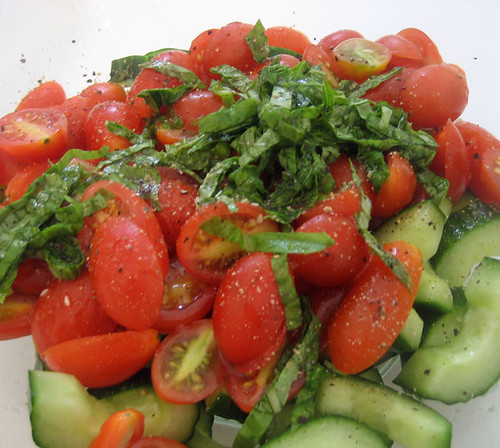
Finally, chiffonade the fresh basil by stacking the leaves, rolling them into a basil cigar, and slicing them into thin strips.

Combine all of the ingredients together in a bowl and then add the following dressing:

Lime Vinaigrette Recipe: This Recipe is Super Easy Too!

Juice of 1 lime

1 tablespoon of extra virgin olive oil

1 tablespoon of honey

½ teaspoon salt

½ teaspoon pepper

Method

Combine all of the ingredients in a container (I like to use a 2-cup measuring cup) and whisk (or stir vigorously with a fork) until it has emulsified.

Pour on your salad and enjoy!

cucumber tomato basil salad

spicy tomato basil  cucumber edamame salad
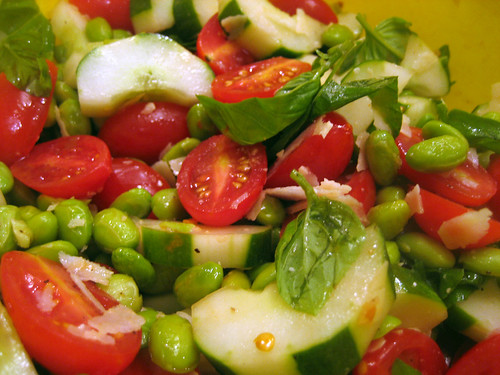
This one has edamame and parmesan, too! Oh and looks like I left the basil leaves intact. Also good!

Tuesday, December 7, 2010

Brick-Oven Pizza at Home

How to Make Pizzeria-Style Pizza in Your Home Oven
brick oven pizza at home

Previously, on Blackberry Pockets… Our pizza dough had proofed, risen, and been shaped. This time, I will show how to achieve the taste and texture of a brick-oven pizza in your very own home!

I would like to thank my friend Pam who gave me the idea to try broiling my pizza. This suggestion put me on the path to figuring out my now tried and true bake-then-broil combination method of pizza perfection.

Note

In order to achieve these results you will require a baking stone and a pizza peel (or similar tool for placing your pan-less pizza in the oven).Now, on to the fun!

Method – 10 Steps to Pizza Perfection!

1. Make sure your stone is located on the center rack, and preheat your oven to 550 degrees Fahrenheit for 45 minutes to an hour.

2. After shaping your dough and putting it into a pan, perforate the dough across its surface with a fork.

3. Place the dough (while still in its pan) into the preheated oven.

4. Bake for 5-7 minutes until the dough begins to caramelize and gets brown on the edges.

5. Remove the pan from the oven, remove the pre-baked dough from the pan, and place it on a wire rack.

6. Set your oven to “broil”.

7. Add your favorite sauce and toppings - I recommend olives, onions, and candied bacon- to what will now be referred to as the “pizza”.

unbaked pizza

8. Using a peel, or other method, place the pizza back in the oven.

9. Bake for another 5-7 minutes, until it reaches your desired level of doneness. Be sure to keep a close eye on it after 5 minutes, because it can rapidly go from Brick-oven badass, to brick-oven burnt.

10. Remove your pizza from the oven and return it to the wire rack.

peeled pizza

Allow to cool and enjoy!

pizza crust bottom
Nice crispy crust!

open crumb
Nice open crumb!

Here are a few ideas for saucing and topping your pizza.


cheese-crisp pizza
Cheese crisp pizza with salsa verde, Monterey Jack cheese, and sliced green chiles!


pizza margherita
Pizza Margherita!

potato pizza
Marinara sauce with caramelized onions, mushrooms, and potatoes!

pesto pizza
Pesto pizza with onions and black olives!


Sunday, December 5, 2010

Pizza Dough Revisited

The more I learn about bread, the more I realize just how much more there is to learn. Almost as soon as I think I have bumped my bakin’ up to the next level (level 2!), I find myself humbled by true talent. Fortunately, I remain excited by the prospect of learning it all! Bread baking has become my favorite hobby and mastering this craft can clearly be a life-long pursuit.

So, after admitting my infantile level of baking knowledge, am I still going to presume to offer a recipe on making pizza dough? Well, yeah. Why not? After all, everybody thinks that they make the best pizza, regardless of skill, right? Lucky for you, with me, it’s actually TRUE!

Pizza Dough Recipe

The Night Before: Develop a dough starter that will add flavor and texture to your pizza.

1 cup all-purpose flour

3/4 cup water

¼ teaspoon yeast

Mix the ingredients together in a bowl until they reach a pasty consistency and are all fully incorporated. Cover the bowl with plastic wrap and set it aside.

The Day of: Make the dough.

2 cups of bread flower

1 cup of all-purpose flour

1.5 teaspoons of salt

1 cup of warm water

1 teaspoon of sugar

1 teaspoon of yeast

1 tablespoon of olive oil

All of the starter

Method

Mix together the flours and salt. Add the sugar to the cup of water and then whisk the yeast into the sugar water solution. Allow the yeast solution to proof for 3-5 minutes until it achieves a foamy head.

Combine all ingredients (the starter, dry ingredients, and the yeast solution) in the bowl of your stand mixer and mix on the low setting for 1 minute. The dough should be a little sticky, but still workable. If the dough is still too sticky, add a little flour and mix for another minute.

When the dough looks like this:


wed dough

Place it in a bowl, cover with plastic wrap, and let it rise for 1.5 hours, stretching and folding ever 30 minutes. Next, add the oil to the dough bowl, put the dough in the dough bowl, and mix the dough around to coat it in oil. Place the dough (in its dough bowl) in the refrigerator and let it rise until doubled (should take three or four hours).


pizza dough

There you go! Beautiful pizza dough from a pizza bakin’ baby. Next time I'll teach you how to make brick-oven style pizza at home!

Stay tuned for next week's exciting episode of "Pizza and Dough-Bowl"!
dough pizza

Saturday, July 17, 2010

Fruit Gems

AKA Pates De Fruit or Pectin Gels

strawberry and peach candies

Oh, pates de fruit (pronounced paht day fwee), my old adversary, long you have vexed me. I’m sure many of you have come across tantalizing blog posts featuring pates de fruits, written by a variety of reputable bloggers, tempting us with beautiful images, and enticing us with delicious tales of these seeming pinnacles of patisserie. How could anyone not want to give these recipes a try? Moreover, who could resist when the execution always seems so easy? Too easy.

I have lost track of how many failed batches of ruined candy I turned out on my journey to fruit jewels. I had great trouble achieving the correct texture, a task that was undoubtedly made more challenging by the fact that I’ve never actually had homemade pates de fruit before. In any case, I was hoping for something with a chewy initial resistance but not too sticky—something akin to a Sunkist fruit gem or a Trader Joe’s fruit gel – but my batches came out like chewy jam, gelatin, or just fruity goo.

So why would I, a candy novice who isn’t even sure what these candies are supposed to taste like, presume to post a recipe for this treat? Because I got it right, friends! I’m sure of it, and I’m proud.

Now, I certainly wouldn’t say that my recipe is superior to any other that’s out there, but it’s just as good (in fact, it’s identical to most), and I have some tips to help you avoid some of the critical errors that I encountered along the way to success. I also have an important warning for anyone who wants to attempt making this or any other pates de fruit recipe: your candy is NOT going to turn out right the first time. I’m sorry, but them’s the breaks; every batch of candy is a little different, and there is an art to making it which requires a process of trial and error in order to achieve perfection. If you’re still willing, let’s get to work.

Lemon Ginger Strawberry Pates de Fruit, Fruit Gems Recipe:

  1. Fresh Strawberries -32 ounces
  2. Zest of one lemon
  3. Fresh Grated Ginger – 1 teaspoon
  4. Sugar – 600 grams
  5. Liquid Pectin (I used Certo brand, canning pectin) – 3 tablespoons
  6. Lemon juice – one lemon

Method:

Line a 9 inch square brownie pan with parchment paper.

Clean and hull the strawberries and place them into a food processor with 1/3 of the sugar, lemon zest, and grated ginger. Process until the mixture is a very smooth liquid.

Next, STRAIN, STRAIN, STRAIN the strawberry/sugar liquid through a fine-mesh strainer and into a pot. You should end up with around 2 cups or 600 grams of strained fruit puree.

Add the second 1/3 of the sugar and half of the lime juice (from half the lime) to the puree, put the pot on your stovetop set to medium-high, and bring to a boil, stirring frequently. When the mixture begins to boil, add the remaining sugar and pectin, and continue to stir the mixture frequently.

Here comes the tricky part: Most recipes say that you need to let your mixture boil until it reaches a temperature of 222 degrees Fahrenheit, which is probably correct. However, I have not once made a batch that was able to reach that temperature. Instead, I suggest just letting it boil for around 30-40 minutes, stirring frequently, until it reaches a very thick viscosity, forms gentle, infrequent bubbles on the surface when left alone, and looks kind of like the following image:

bubbling peach
(Actually, an image of peach bubbling crude, but for the purposes of this blog, we'll consider it strawberry)

When you think the candy is ready, transfer it from the pot to the lined brownie pan in an even layer. Place the pan on a cooling rack in the refrigerator and allow the candy to cool and set up for 10-24 hours. When the candy has set up, you can remove it from the pan and parchment, cut it into the shapes you like and roll it in sugar. These fruit gems make elegant gifts and delicious treats!

Important Notes

  • STRAINING: It is absolutely essential that the fruit be strained through a fine mesh strainer after it is pureed. Otherwise, you’ll end up with something closer to jam than candy.

  • TEMPERATURE: Your candy thermometer might never get up to 222 degrees, 210 degrees, or even 200 degrees. I’ve tested these recipes with multiple candy thermometers and my candy rarely got up to temperature. In fact, many times the temperature of the candy would drop precipitously and without reason. This is the main reason why making these candies is a process of trial and error; you will need to use your senses to determine if your pot of bubbling crude is ready or not.

  • NEVER USE BUTTER: I found a recipe, which I tried, that called for the addition of butter. Now I’m typically a butter proponent, and I’m not sure how it could ever make anything worse, but guys, it was so bad! So bad, oh my gosh!

  • SUBSTITUTING GELATIN: Don’t substitute gelatin for pectin. Why? Because your batch will come out more like jello shots than candy.

  • NOT SETTING UP? If your candy does not set up and become firm, you can likely salvage your work by returning the results to a pot with another ½ cup of sugar and boiling the mixture again for another 15 minutes.

Watermelon and Peach Pate de Fruit
watermellon pectin candy


Well, with that, I wish you all the best in your candy making efforts. Regardless of how your batch of candy ends up, it is still almost always edible. And many times, it is tasty, if perhaps, not what you expected. Furthermore, the process is always fun; just try not to burn yourself!

Homemade Pate de Fruit Candy Gift Box
homemade candy box